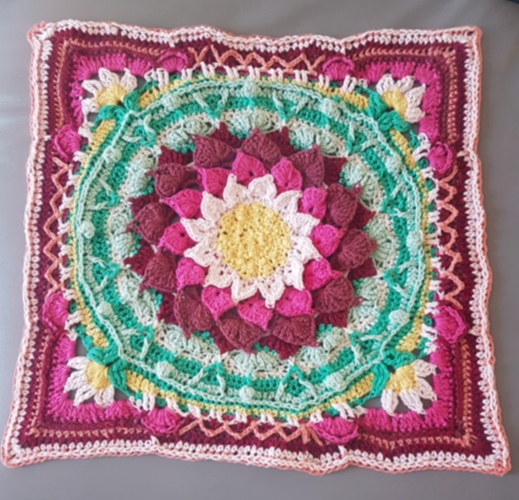
This is what Irmar has been teaching me! It is my first official completed work in crochet.
Thank you for your awesome lessons, Irmar!
I’m still making mistakes and it’s not totally straight, but I have great fun learning with Irmar ![]()
My mom said it was pretty so I gave it to her so she could put it on her sofa ![]()
Thank you, I’ve been having lots of fun too! Especially when hearing you say “What is she talking about?” after an explanation. And then “Ah, yes, okay, I get it…”
It will become straight if you wet and stretch it, then iron it. It’s cotton, it can easily be ironed.
Waiting for you to post your second square!
For those who may be interested, the pattern is called Enchanted Garden, a mix done by Courtney Laube of two patterns: the Crocodile stitch flower block (by Joyce D. Lewis) and Sophie’s Garden (by Dedri Uys).
Thank you for your tips! I’m always amazed because you can answer all my questions immediately and things I thought were hard at first become less hard thanks to your guidance. That’s motivating for a beginner in crochet!
Yeah, sometimes feels like I’m having a Chinese lesson with my teacher when we do crochet. The feeling is the same! “What does that mean?” x10 The difference is you’re speaking French, I understand it, but I don’t understand the meaning of these words taken together in the context of crochet.
Thanks to repetition and practice though, the feeling of being able to create something from scratch or learning something is really addicting.
I’ve just started crocheting at the end of last year and I’m still a bloody beginner. My works are not even close to yours. Just simple hats or figures.
That Enchanted Garden pattern looks so detailed and like a lot of work. You’ve done a good job!
Don’t think we started with that, though!
First we did, I don’t know, maybe two months practicing different stitches, including, you know, fan stitches, filet, front post and back post stitches, crocodile stitch, broomstick crochet (with the cardboard roll inside kichen paper!) bobble stich, popcorn stitch, puff stitch, curlicues, foundation single crochet and so on and so forth. This means that when those stitches appear in a pattern they are like old friends. It’s like teaching dance. First the various steps and then you put them all together in a choreography.
On Wednesday we are tackling mosaic crochet which is immense fun!
I’ve been crocheting for five years but I’ve never done mosaic crochet. I’ve been avoiding it because I’m afraid it will be hard on my wrists. From the videos, it seems that it requires a small hook and tight tension. But it looks so beautiful!
Depends on what you want to make. If it’s for a bag or rug, probably. But if you want to make a shawl or blanket, then the opposite is true, you want it to be as soft as possible. I am a very loose hooker, because I also want to protect my wrists (I’ve had tendinitis and carpal tunnel problems in the past) and because when you work with soft, not very twisty yarns, tight crocheting will invariably split the yarn and make you curse every two minutes.
And there are at least two different techniques for mosaic crochet.
Overlay: you only make back loop stitches, so that the front loop remains free. Then work on the front loop of the stitch two rows below. You only work on the right side and cut the yarn at the end of the row.
Example I made yesterday:
Insert: you have made a row of dc with skipped stitches and chains, and then, two rows after, you work into those skipped stitches).
The chain and skip method results in a softer fabric because you don’t do something on top of something already done, adding bulk, and it’s also smoother, no bumps, in case you want it as a coaster or trivet. It’s also back and forth, so no cutting at each row, no zillion ends to hide at the end. The disadvantage is that for every row of the chart there are two rows (back and forth), so the design gets elongated. But you can make designs specifically tailored to take this into account.
Here is a sample of this method I made this morning.
@piranna: This is what we’ll be doing this week.
Crying in my heart ![]()
Grazie mille ! Ciao Ciao !
Oh my that’s so pretty and it looks very advanced @piranna ![]() I once started crochet but I don’t really have the patience and I found it quite difficult.
I once started crochet but I don’t really have the patience and I found it quite difficult.
How do you and @irmar do the lessons? Videocall? Just curious.
Yes!
I think I would have given up without Irmar’s tutoring. I def needed a teacher for crochet. It’s like reading about how to swim or ride a bike. Even with videos, too many videos you can find and you don’t know which one is good or from where we begin, the basics you should know… I find it difficult to learn by oneself.
The problem is that in a videocall you are face to face. The YouTube tutorials are made in such a way that you think you are the person working and their hands are your hands. They put a camera behind their shoulder, on a tripod or a high place. They also have some sort of handle, from what I understand, to zoom in when needed.
All this is complicated to do with a laptop (and zooming in is out of the question).
So she has to guess from seeing me in front of her, I sometimes try twisting my hands to show her my perspective, or I show her drawings from books or websites, or a couple of minutes of a carefully chosen youtube video that shows it more clearly.
It’s true that there are many many crappy Youtube videos, people with clumsy, bad technique, which will put strain on the hands and fingers and result in uneven work, so I do some research beforehand. Now I’ve kept the links so if another person comes, I have them ready.
And on the other hand, I cannot see well what she’s doing. She does show me her work every now and then but I cannot distinguish details properly and the lighting is behind her (as it should be, since she’s working and she needs light on her work) which makes it harder for me.
Surely being physically side by side is a lot easier. But everything can be done by persistence, and she has done amazingly so far.
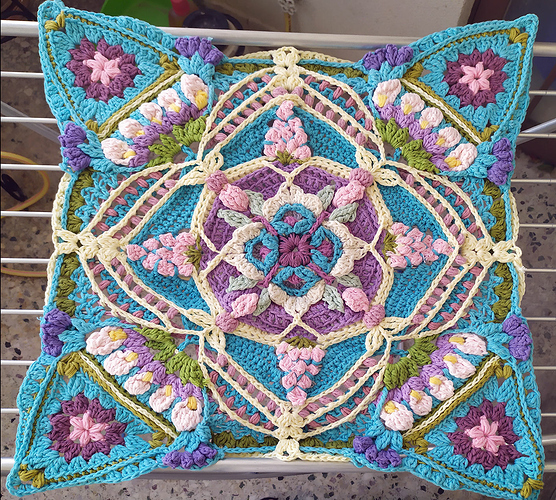
This is the other thing we did together (Chrysalis throw by Jen Tyler, only up to part 2 of 5).
This is my version, Piranna still has to weave in her ends and I believe she’ll post it shortly.
I will continue to get a throw, whereas she’s stopping here and making hers as a pillow I believe.
We can also put it on a laundry rack? Such vibrant colors! Reminds me of summer or spring ![]()
Ugh! I haven’t done it yet… I’m into preparing my French classes ![]()
It is on a laundry rack only for the picture. If you take a picture inside, especially with electric lights, it will be all yellowy and all the photoshopping in the world won’t be able to restore its original colours. Only natural light and whenever possible also outside.
Wow, that’s beautiful. I tend to make baby blankets or amigurumi. I usually avoid anything that has that many yarn changes, I hate weaving in. ![]()
I cannot believe that when I say “worry Knot” no one knows what it means! wow, I have heard that all my life, I am doing my “worry knots” today. God said for us not to worry, Right? when I crochet, I also worry knot. its symbolic we put our worries in Gods hands, and I also knot worry while I crochet. wonder if any one understands that precept?
I never knew the expression “worry knot”, I looked it up and I saw it’s a rosary/prayer beads. So yeah, now I know what it means. We also have “worry beads” in Greece.
https://greekcitytimes.com/2017/10/16/komboloi-history-greeces-famous-pastime/
That is so pretty ![]()
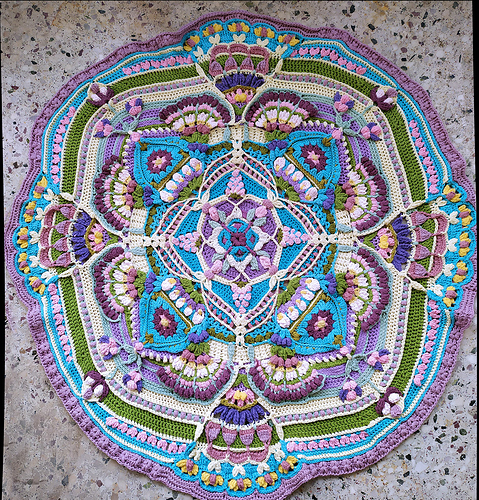
This is called the Chrysalis throw. It’s not finished yet, the picture is after the end of part C (there are three more parts!)
Ohhhh that’s so pretty ![]()
![]()
![]()


